How to Fix an American Girl Doll - Part One, Cleaning and Restringing
Hello everybody! Today I'll be showing you the first part in fixing my thrift store find, Truly Me #27. In this part I'll be showing you how to clean and restring your AG doll. So let's get started!
So when it comes to cleaning AG dolls, I like to use the most simple method to start, then move my way up from there. So in this case we'll start with the baking soda method that American Girl recommends. You'll need some baking soda in a bowl,
Water in a separate bowl,
Two small washcloths,
And I always like to have a large towel to put under my doll since I seem to always make a huge mess when I do this XD
Ok! So first things first, pour a little bit of water into the bowl of baking soda and give it a stir! So AG gives you exact measurements on this, but I usually just wing it ;)
It should be a nice consistency, not too thick that you can't spread it on dolly's skin, but also not so runny that it goes all over the place when you try to rub it on your doll. If it ends up too runny, just add some baking soda. Too thick? Try a little more water.
Now that your baking soda mixture is looking good, dip one of the wash clothes into water, I like dipping the corner in.
Wring out the water a little bit, then dip the wet part of your washcloth into the baking soda mixture! (Does anyone else think it looks like liquid cloud on my washcloth?)
Then rub it on the doll's vinyl. Don't use your super human strength to scrub the living tar out of the vinyl, just gently work it in a circler motion.
Once you finish then wet the other corner of the washcloth and wipe all the baking soda off.
And after that, wipe with the other washcloth to dry. I'm not sure it you can see but it looks much better, the left leg is the one we cleaned. Continue this process on all vinyl limbs.
TIP: When you're wiping down your doll, you think you've got all the baking soda off. But low and behold you come back to your now dry doll and it's all white between her toes and finger nails! *DUN DUN DUN!!!* Needless to say, it's annoying. And can be difficult to get off. So here's a tip, after washing the baking soda off your doll, wet a new section of washcloth. Then wipe well in the direction of the lines on her toes and fingers. Make sure you get it nice and wet, then wipe until dry.
Also, don't be afraid to clean her face with this method ether, this is the method American Girl recommends, so it won't hurt her I promise :) Just remember to be gentle and not to baking soda or water into her eyes or wig cap. The water and baking soda could affect the way the eyes open and close and (if they are pinwheel eyes) they could go silver! And having baking soda in the doll's wig just isn't good XD
TIP: With most of my dolls I like to pull the back into a ponytail or something, but with #27 her hair was cut WAY to short to totally pull back in any way, then I had the idea of tucking her hair into a beanie (Which was beautifully crocheted by my BFF's awesome mom) and it worked great! I know most dolls don't have hair like #27's, but it might work great for dolls like Ivy and Kit as well!
All clean and looking good!
Ok so I finished the baking soda method and it worked a lot better on the stains then I thought it would!
the mar under her chin is gone,
And the one that looked like blood is now very faint!
There is still a mark on the inside of her leg, but it's high enough up that it'll be covered by her clothes. It just goes to show you though, always start with the basics, you might be surprised by the results.
Now there still is this ink stain on her leg, baking soda can't do anything about that. I was expecting that all the marks to still be there after baking soda, but they were pretty much gone. So I won't be trying to get the ink stain off, but if you have/found a doll with a ink stain and would like to remove them. Then you'll have to use acne cream with 10% benzoyl peroxide in it. For this method simply apply it to the stained vinyl and set her in a sunny window.
And cover what is not being treated with a towel like so. Some people also put saran wrap on were the acne cream is so it doesn't dry out, so you can do that as well. Check on your little lady every few hours, and when you're happy with the results, then go ahead and take her out of the window and clean the acne cream off.
TIP: When putting older dolls and dolls with pinwheel eyes (the pattern of the eyes that dolls such as Kit and Molly have) in the window to be treated, I'd recommend taking the head off to prevent silver eye or bubble eye, since both can be caused by too much heat/sun exposure. If your treating a stain on her forehead or something, then just cover her eyes the best that you can :)
And never, EVER! Put the acne cream ANYWHERE within these circles around the eyes, because if you do you'll melt your doll's eyeballs (It makes you second guess putting that stuff on your face doesn't it? XD). Ok, so that's how I cleaned #27, with that said let's move onto restringing!
RESTRINGING
-----------------------------------------------------------------------------------------
Ok now it's time for the scariest part of fixing #27, restringing. So first you'll need an AG doll (oh wow Katie that wasn't obvious at all...),
4 elastic cords about 3" inches long,
8 brass ferrules,
TIP: I bought my elastic and ferrules on eBay for really cheap ($5 shipped if I remember correctly), I recommend just buying a kit so you don't have to worry if your cord or ferrules are the right size. Just search "American Girl restringing kit" on eBay and you'll have lots to chose from.
You'll also need a hair blow dryer,
Some sharp scissors,
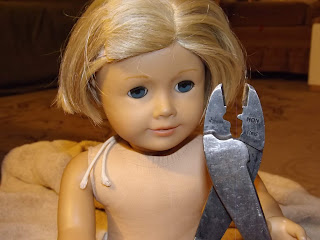
Clamp thingy,
A crimper,
And a bag, a box, or whatever you can find to put your doll's stuffing into!
#27: "I'm not very sure about this anymore.... Will it hurt much?"
Katie: "Of course not..... At least I don't think it will, I've known how to do this for a while..... But this is the first time I've actually had to do it...."
#27: "WAIT WHAT?!?"
Katie: "UHH, NOTHING! Uhhh let's get started shall we?"
So first thing do is untie the string,
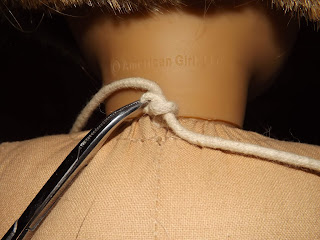
American Girl dolls usually have three knots, the first one is the easiest, but the next two might be a challenge, so your clamper would be a good choice to carefully untie those annoying knots.
Now that the knots are out, wiggle her head until you can pull it out.
Woo hoo! Nailed it XD
Now you're ready to unstuff, make sure you get it all out and put it into your bag so you don't loose any.
TIP: If your doll was produced in the early 2000's then she may have a tag in her shoulder seam, this tag pinpoints the exact date your doll was made! #27 is more like a 2012 doll, so she doesn't have one of those, but it's definitely fun to look out for!
TIP: You should totally eat a candy bracelet while you fix your dolly! They're delicious and totally in style right now ;D Just don't wear it while you unstuff and stuff your doll, it wouldn't be as tasty with stuffing in it.
Ok here's dolly all unstuffed and deflated,
And here's the bag full of stuffing, I still can't believe it takes that much stuffing to fill those dolls, it's amazing!
Inside an AG doll are these little white domes, and strung through them is the elastic cord. Depending on when your doll was made she'll ether have a knot or a ferrule, the ferrules are much better than the knots. While the knots are cheaper for AG to do, the limbs become loose much faster.
Like this ^ This is a great method if your doll's limbs aren't crazy loose or for a more temporary fix. But honestly, it's just best to fix it for good. When I got Samantha her legs were way looser than #27's (which is saying a lot), I was going to restring her but totally chickened out of it and did the hairband method... I'm not going to lie I regretted it afterwards because her legs were and still are loose! So even though it's scary, it's best to restring.
Now the next step is to actually to cut the elastic and take the limb off. It's going to be terrifying, so I won't rush you into this step. Instead, take a breath, prepare yourself, and take a nibble out of that candy bracelet. (believe me, I did XD)
Are you good? Ok, here it goes....
Take your scissors, and making sure you aren't going to cut the cloth, slip your scissors under the knot and cut through.
You did it! Yay! I'm so proud of you!
Here's the white cup,
And here's the arm!
Repeat that step until all the limbs have been cut loose.
See that white cup inside the limbs? We'll need to get those out to restring. How? Well, that's were the blow dryer comes in...
Use your blow dryer to heat up the hole in the vinyl.
TIP: I started on the low setting of my blow dryer, but after several minutes the vinyl wasn't pliable enough, so I turned it to high. But all blow dryers are different, so start on low, and if it doesn't make the vinyl warm enough to get the cup out then turn it up.
It may take a minute, but when it's ready it should be able to be squeezed like this.
While it's hot, use your clamper to pull the cup out. But be careful not to break the cup.
The cup is out, yay! You can go ahead and throw the old elastic away.
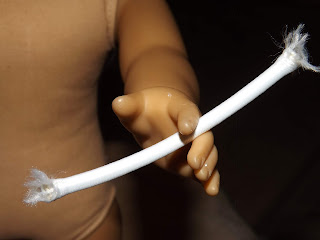
Take the white cup that was in your doll's limb and thread some new elastic cord through.
Place the cup about an inch from the end and slip a ferrule on top of it. The wider end of the ferrule should face the cup. Crimp twice.
If you did these steps quick enough then it should still be soft enough to pop the cup back in, but if not, no worries! Just reheat it with your blow dryer, then pop it in with the ferrule facing inward.
TIP: I found it easiest to pop the cup in by placing it sideways and pushing it in that way. Just make sure you don't let go of the elastic.
String the elastic through the limb's corresponding socket.
Thread the other cup though the elastic and then another ferrule.
Ok, now pull that cord as tight as you can! And keep that tension while you clamp your clamper right above the ferrule. Crimp twice.
Congrats cool bean, you've just finished your first limb! Repeat this process for the rest of the limbs, doing them one at a time.
Ok, all the limbs are back on and it's time to restuff!
Pack the stuffing firmly and evenly, getting it in between her legs and above the shoulders. Remember, you need to get ALL that stuffing back in there.
TIP: Sometimes the stuffing can get a little lumpy, so just try to keep it as smooth as possible, and once your done stuffing you can kinda work the body with your hands to smooth the stuffing as well.
Making the neck tight again is hard, this is the way I've found works best. (This was really hard to do while taking pictures, so I'll try my best to explain it) Knot the string and pull it as tight as you can without breaking it, then take your hand around your doll's neck and hold the casing while pulling both ends of the string with the other hand.
After that, pull the knot tighter (with both hands of course). Repeat pulling and tightening until the casing is tight around the neck. then make two more knots.
And there you have it! #27's limbs are all tight and can hold a pose!
See? XD I hope this post was helpful to you guys! It was fun being able to tell/show someone the things I know and do when buying used American Girl dolls, none of my friends are into AG except for one, and I think she gets creeps out when I tell her about taking their heads off and stuff XD #27's on her way! Be sure to tune back soon for removing scratches/shine marks and rewigging!
Oh, and if you're wondering, Yes I did finish my candy bracelet LOL!
Have an awesome day everyone!
-Katie :)


"So first you'll need an AG doll," sounds right. XD
ReplyDeleteOh my goodness! This was SUCH a great tutorial, Katie! I have watched Youtube videos on this sort of thing but the pictures are so much easier to follow and you are great at explaining.
I feel you with trying to take pictures while technically needing both hands to do something else. Doll bloggers should be called superheroes. ;)
That candy bracelet looks so good BTW. :)
-Jewel
http://www.dollnotebook.com/
LOL yep, it'd be kinda hard to restring without one XD Wow thank you SO much! I can't even tell you how much that means to me :) Yes! It's soooooooo hard! Like that picture were I was heating up the leg, I was holding the leg in one hand, the camera in the other hand, and the blow dryer between my legs while trying my best to stay still for the picture XD We are superheroes! We somehow get dolls to balance, we put out posts every week ( which is a lot harder than most people realize), and we harness the awesome power to bring our dolls' characters to life! :) LOL thanks so much girl!
Delete-Katie :)
NP! WOW! YESSSSS!
Delete-Jewel
:) LOL YESSSSS!!! ;D
Delete-Katie :)
Hi Katie! Oooh these are some great tips!(especially the one about the candy braceletXD)
ReplyDeleteYou are sooo brave to restring a doll. If I ever get a used doll with loose limbs I probably would...that is if I didn’t chicken out :p Great post!
~simplyag.weebly.com
Hey Madison! Thanks! I really hope it was helpful! (LOL yes! The most important tip ;) ) Aww thanks, it was really scary doing the first limb, but after that it was way easier. Awesome! LOL I've chickened out of doing this twice XD It's scary to do at first but is so worth it :) thank you!!!
Delete-Katie :)
You’re so welcome! Yeah, it must be so scary at first to basically take apart your doll*shivers* I’m glad #27 came out aliveXD
DeleteI can’t wait to see the wig!
~simplyag.weebly.com
It is! I was supposed to do this on Molly and Sam but chickened out on both. The first time I actually opened up my doll was to do the hair band method on Molly and no joke I literally started feeling like I was going to pass out XD LOL so is #27! Yay! I can't wait for you to see it too! I ended up getting a different wig because the curly one had a defect, but this new one is soooooooo pretty!
Delete-Katie :)
Yay! I can’t wait to see the wig! Uggh, it stinks when something has a defect, but I’m glad you love the new one! Yay, I probably should fix Kanani’s limbs, considering how loose they are, but I gave her a pass because she’s my oldest doll.
DeleteHave a good day!
~simplyag.weebly.com
Yeah it does, but I wasn't really in love with the wig when it got here ether though, it was more white looking than blonde and just looked odd on #27. But this new one is much closer to her original color :) LOL Molly wishes I have her a pass XD thanks! You too!
Delete-Katie :)
Well, then I’m glad the wig had a defect lolXD
Delete~simplyag.weebly.com
Hahaha me too XD
Delete-Katie :)
"Don't use your super human strength to scrub the living tar out of the vinyl"
ReplyDeletei'm dead. XDDDD
Katie! You are simply the best! Thank you soooooo very much for posting this series! It's extremely helpful and I can't wait for the next part. :) (not just saying that)
~justAG
LOL XD I'm so glad it made you laugh! Awww thank so SO much! Your comment truly just made my day <3 thanks for posting such sweet comments!
Delete-Katie :)
XD
Delete<333333333 np just being honest..... :)
:)
Delete-Katie :)